Monday, January 16, 2012

Raspberry Lime Yogurt Cake

Let me start off by saying that I had to type the title of this post approximately 12 times because I had a complete mental block.  You almost had to read about Chili Lime Yogurt cake.  Can you just imagine that?!  Yum.
This recipe is based on Ina Garten's Recipe for Lemon Yogurt Cake http://www.foodnetwork.com/recipes/ina-garten/lemon-yogurt-cake-recipe/index.html.  It was originally found in the Barefoot Contessa At Home cookbook.  And, totally unrelated, but super awesome, I have an autographed copy.  I didn't get to meet Ina, but my aunt and uncle sent me an autographed copy as a wedding present and its still one of my favorite gifts.  I photocopy pages I use so I don't ruin the book (I tend to explode ingredients over recipes and cookbooks while I cook).  The Barefoot Contessa is (in full disclosure mode) not my favorite Food Network show, but her recipes are among my all-time favorites.  This is one of my go-to dessert recipes.  It's decadent and indulgent, but in a surprising twist, is made from fat-free yogurt and canola oil instead of butter and shortening.  It's not guilt-free by any means, but it is reduced guilt.  And it's super light and fresh tasting.  I've made it many times just as the recipe reads, but this time I switched things up a bit and subbed raspberry yogurt for plain, and lime for the lemon.  I also skipped the simple syrup soak and found it didn't make a difference in the taste.  Give this a try the next time you have company or you need something to infuse a little summer into a dreary day.  Oh, and if you double the recipe it makes a really nice bundt cake and play with the citrus and yogurt flavors (orange and vanilla would be pretty amazing I bet).


Raspberry Lime Yogurt Cake

  • 1 1/2 Cups flour
  • 2 tsp baking powder
  • 1/2 tsp salt
  • 1 Cup raspberry fat-free (or low fat) yogurt
  • 1 1/4 Cups sugar
  • 3 eggs
  • 2 tsp grated lime zest
  • 1/2 tsp vanilla extract
  • 1/2 Cup canola oil (or vegetable oil)
  • 1/4 Cup freshly squeezed lime juice

For the glaze:

  • 1 cup powdered sugar
  • 2 Tbsp freshly squeezed lime juice
Grease and flour a loaf pan.  Preheat the oven to 350°.  In a bowl, whisk together the dry ingredients. In a seperate large bowl, whisk together the yogurt, sugar, eggs, lemon juice and zest, and vanilla.  Slowly and gently add the dry ingredients to the wet.  Once combined, fold in the oil until completely incorporated.  Pour into the prepared pan.  Bake for 50-60 minutes until a toothpick comes out clean.  Let cool.  When cooled, drizzle the glaze over the top.

Glaze
Whisk the powdered sugar so there are no lumps and then slowly whisk in the lime juice until smooth.  

Tuesday, January 10, 2012

Horseradish Crusted Chop Steaks

Do you know how sometimes it feels like you do really well and use up all of the food in your house in the appropriate time, and then other time you have way too much waste? Then there's some weeks when it feels like food just doesn't last as long as it should? We've had one of those weeks this week. I bought buns to make hamburgers and deli meat (chipped ham-for you Pittsburgh folks) and the usual produce. We had tons of leftovers, so the deli meat got pushed to the back of the fridge and unfortunately had to be tossed. Most of the produce got used, but the bananas went bad way faster than they should have (thankfully they can be frozen for smoothies or banana bread or chocolate banana milkshakes). The icing on my proverbial cake though was the buns! Two days after purchasing nice fresh (preservative free) bakery buns, I prepared to make hamburgers for supper. When I opened that nice bag of beautiful buns they were all completely moldy. I really hate to waste food, but I hate it even more when the waste isn't because of eating out too much or forgetting something in the deep dark depths of the fridge. So, my long winded story in a shorter version: Instead of hamburgers for dinner, we had chop steaks. *This recipe would be equally delicious with ground turkey or chicken for those readers who prefer to avoid red meat.  It is a great way to enjoy ground meat without a bun and with tons of flavor.  A nice juicy patty with Dijon and horseradish mixed in, topped with creamy horseradish and parmigiana sauce that gets a nice crust in a hot oven.
P.S.  Don't forget to enter my giveaway here:  Smoky Bacon 'N Blue Dip & a Giveaway

Horseradish Crusted Chop Steaks
1 lb ground meat (I used 92/8 ground beef)
1 Tbl dijon mustard
1 Tbl grated horseradish
salt & pepper (I used 1 tsp salt and about 3 grinds of pepper, but adjust according to your tastes)

Preheat the oven to 400°.  Mix all ingredients together gently until combined and either refrigerate until ready to use or make into 3-4 patties.  Top with horseradish parmigiana sauce and bake for about 20 minutes to desired temperature.

Horseradish Parmigiana Sauce
2 Tbl grated horseradish
2 Tbl fresh grated parmigiana
1/3 cup mayonnaise
1/3 cup sour cream

Mix all ingredients until combined.

Linked to Inside BruCrew Life's Trick Or Treat Tuesday & Mandy's Recipe Box's Totally Tasty Tuesdays

Friday, January 6, 2012

Smoky Bacon 'N Blue Dip & A Giveaway!

Its really hard for me to believe that I have been blogging for 6 months.  I've had so much fun sharing recipes and making new bloggy friends.  So, today, in addition to sharing a recipe for an awesome Smoky Bacon 'N Blue Dip (seriously you'll be hard pressed not to eat it with your fingers), I've put together a little thank you giveaway for my blog readers for sticking with me as I learn my way around.  I have a fun gift bag of Pampered Chef products and a $5 Amazon gift card, because who doesn't love Amazon!  You can use the RaffleCopter giveaway application at the bottom of the post to enter.  I'll draw a random winner next Sunday, 1/15/12 and contact the winner (make sure to leave a way to contact you!) that day.  Good Luck!
On a food related note, it's football playoff season and that means lots of appetizers.  I love the Blue Cheese dip with veggies, crackers, drizzled over a salad, or smothered over top of a warm baked potato.  Unfortunately, I took this dip to a party and felt a little weird snapping a photo while innocent bystanders were just trying to have a snack, so no pictures for you today.


Smoky Bacon 'N Blue Dip
2 Cups Sour Cream
1/2 Cup Mayo
1/2 tsp onion powder (or 1 finely chopped scallion)
4-5 shakes of hot sauce
1 shake of liquid smoke (optional)
1 Tbl Worcestershire sauce
1 1/2 Cup crumbled blue cheese
6 Strips of cooked, crumbled bacon

Mix all of the ingredients except for the bacon together in a medium bowl.  Refrigerate for at least 4 hours, or up to 2 days.  Top with the crumbled bacon just before serving.  Serve with veggies or crackers, or use as a topping.
a Rafflecopter giveaway

Thursday, January 5, 2012

Warm Mustard Potato Salad

I read on a blog somewhere a long time ago about an idea of allowing kids 5 items that they don't care to eat.  Anything else they have to at least try.  Here's the thing, I need about 10 items for myself.  My husband and I have had discussions about how broad the list items can be.  For example, can you say fish is one of the items, or do you have to be specific, like Salmon.  I have since made an executive decision.  As the mom, my list can be broad.  However, kids won't have that kind of levity.  And, yes, I can do that, 'because I said so."  I also don't want Lilly (and any future minis) to be as picky as I am, so I'm really just guiding them in good life choices.  Right?  Without further ado, my list of 5 despised foods:
1.) Fish
2.) Onions
3.) Raw Tomatoes
4.) Beans (except for green)
5.) Mayo

Because of my mayo aversion, potato salad has always been a no-no.  But, hubby likes it, so I finally found a good delicious compromise.  
 Steam 2-3 yellow flesh potatoes over 1 inch of boiling water. Until just fork tender (took 12 minutes for me).
In a seperate bowl, mix olive oil, red wine vinegar, dijon mustard.  Add hot potatoes.  Grate one hard boiled egg using a large holed box grater over top.  (Yes, isn't this genius?  It's from Everday Food Magazine--isn't Martha a genius)  Sprinkle with coarse salt and fresh ground black pepper (to taste).  Toss to combine.  

Serve warm or at room temperature.  

Warm Mustard Potato Salad
(Adapted from Everyday Food Magazine)
1 lb yellow flesh potatoes, 2-3 potatoes
2 tsp extra virgin olive oil
2 Tbl red wine vinegar
2 tsp dijon mustard
1 hard boiled egg
salt and pepper to taste

Cut potatoes into 1 inch chunks and steam over 1 inch of simmering water (about 12-16 minutes) until fork tender.  In a medium bowl, whisk together olive oil, vinegar, and mustard.  Add hot pototoes.  Grate the egg over top and add salt and pepper.  Toss to combine and serve warm or at room temperature.

This post is linked to A Little Nosh's Tastetastic Thursday and Miz Helen's Full Plate Thursday check out all of the amazing links there!

Wednesday, January 4, 2012

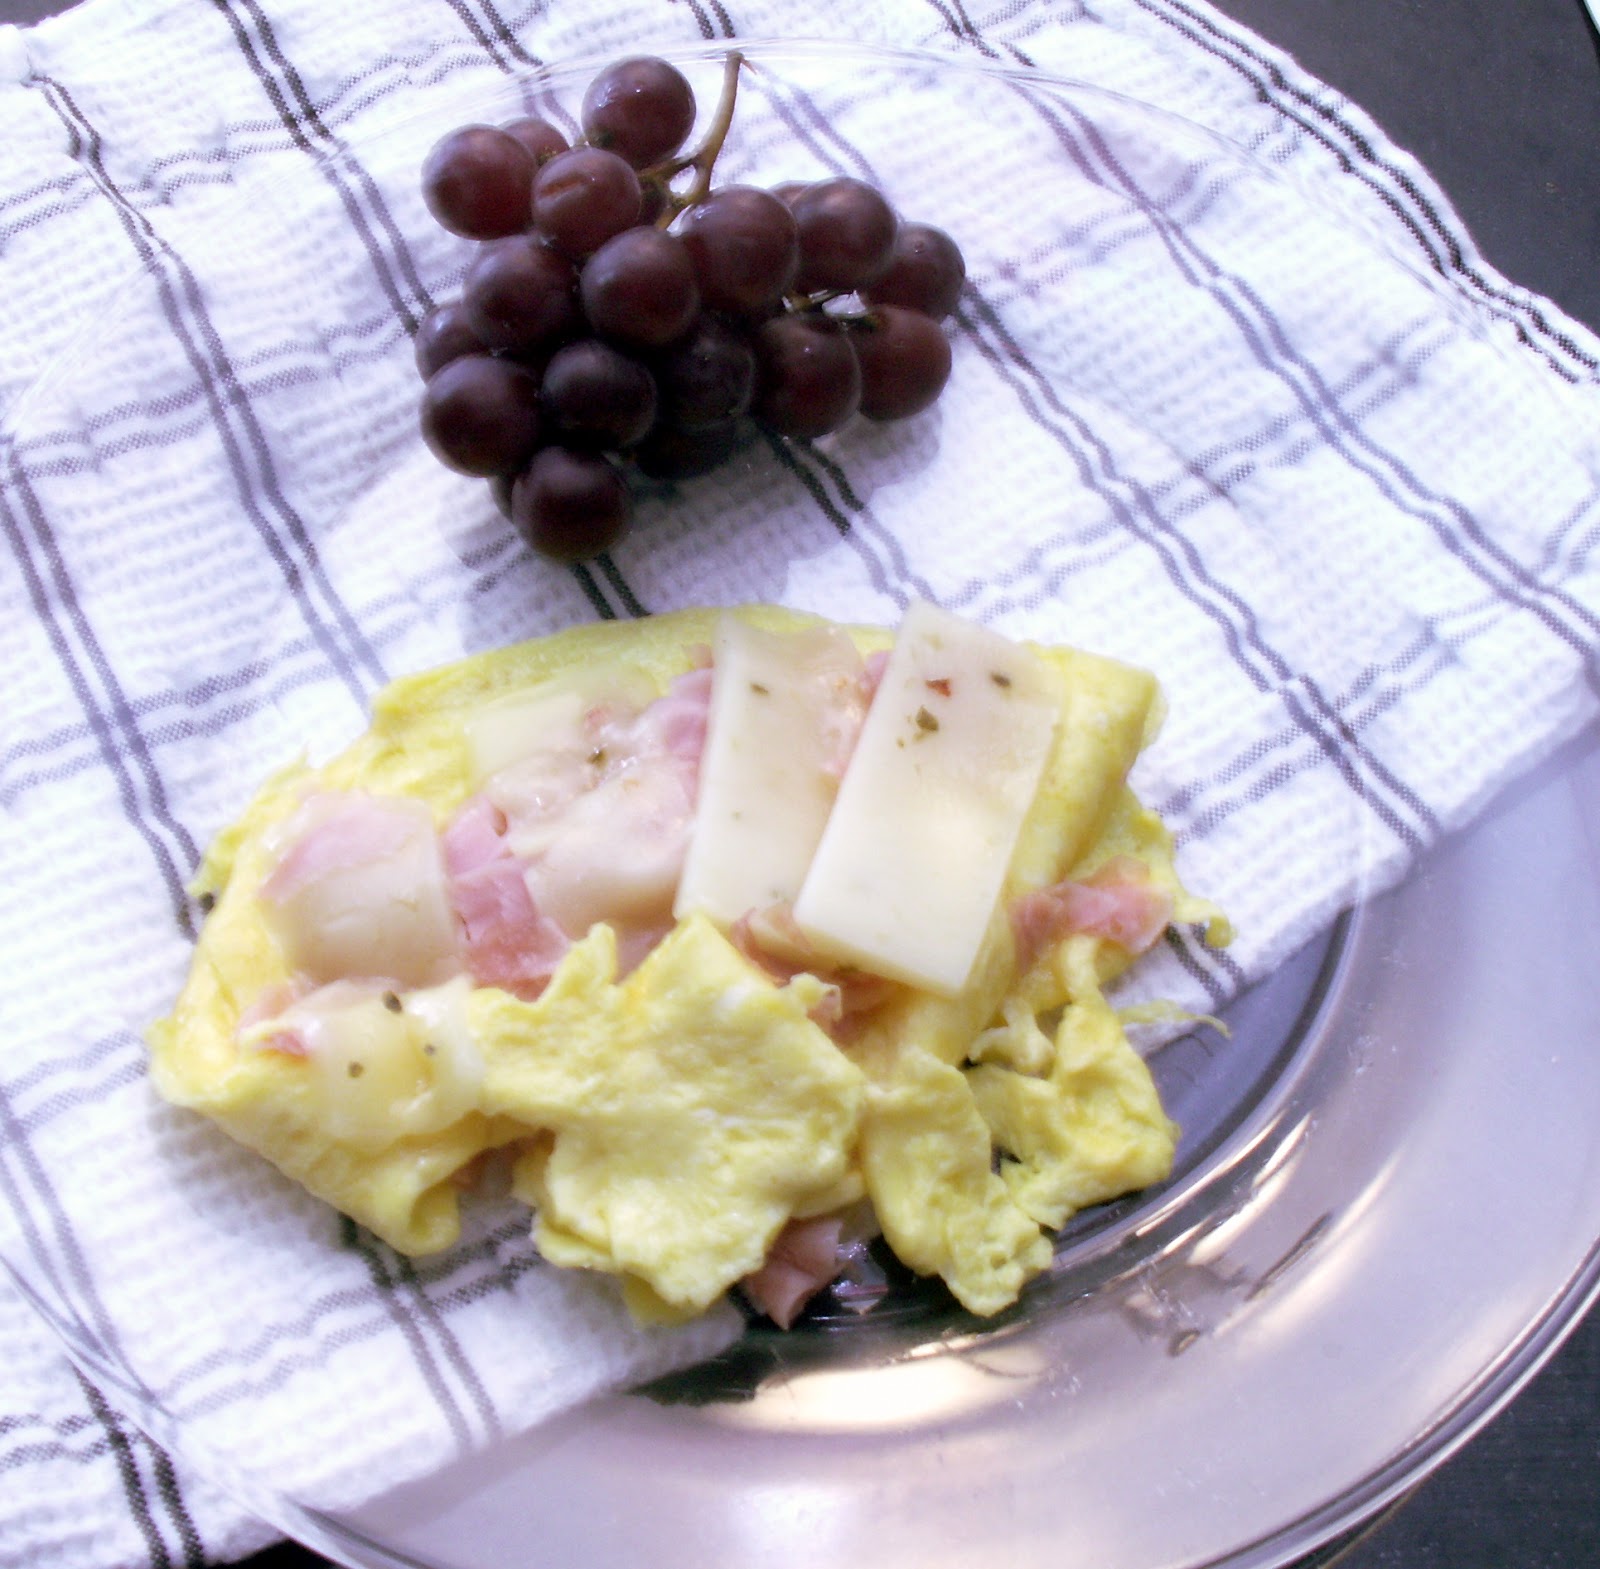
Best Scrambled Eggs!

Today's post is brought to you by slackers everywhere.  I just realized that its been over a month since I last posted!  Maybe you didn't even notice I'd been gone?!  To get started back into it, I want to go slowly.  No recipe today, just a how-to on making the best, easiest, (and sort of healthiest) scrambled eggs.  

Growing up, I worked in a country club restaurant as a waitress.  I pretty consistently worked the Sunday brunch shift and I loved it.  The Sunday shift had regulars, and I loved getting to know people.  I could bring their drinks as soon as they sat down and watch their kids grow.  But most of all, I loved that before we got busy, the cooks always whipped me up a breakfast.  I'm a breakfast fiend.  I'm pretty sure that between breakfast foods and pizza, I could live very contentedly.  I started to ask the sous chef on duty what made their eggs so delicious (almost all restaurant scrambled eggs are light and fluffy and oh-so tasty).  The first time I asked they said they added whipping cream.  The second time I asked they said they didn't add cream, they added 1/2 tsp honey for each egg.  And the last time they said never add anything but water.  Does this make sense to you?  Because it certainly didn't to me.  I've been searching and trying different methods and I finally found my "better-than-a-restaurant" scrambled eggs.  Are you ready for this?!
Beat 2 eggs in a bowl until they are bubbly, frothy and you cannot distinguish the whites from the yolks at all.    Add salt and pepper if desired.  If I'm making a large batch, I use a hand mixer set on low.  In a small non-stick skillet put just enough oil, butter, or non-stick spray to coat and set the heat to low (2 is what I use on my gas range)  Give the eggs one last whisk and pour slowly into the skillet. If you like large curds, just lightly push the eggs around every few minutes.  For smaller curds, you can continue to scramble in the pan.  KEEP THE HEAT ON LOW!  This will take awhile, but good things come to those who wait.  

Once the eggs have solidified a little, you can use half of the skillet to warm up any toppings/mix-ins.  Top with cheese if desired.

Serve and enjoy!  

Keys to a perfect scrambled egg:
  • Add nothing to the eggs except salt and/or pepper
  • Whisk eggs vigorously, that's how they get fluffy
  • Cook on very low heat-creates even, fluffy, moist eggs


This post is linked to Inside BruCrew Life's Trick or Treat Tuesdays.  Check out the great links there (and while you're there check out the awesome blog--I love her recipes!!)


Thursday, December 1, 2011

Salted Caramel Crumb Bars

I guess that the holidays are officially here.  I sort of fell off of the blogging wagon last week so I never discussed our Thanksgiving.  Here's the thing, growing up, I thought we had HUGE holiday parties with our family.  There were usually 13 of us, aunts and uncles, grandparents, and cousins-we all crowded around one table and ate one giant turkey.  Then, I met my husband and was invited to Thanksgiving at his Uncle's house.  I think the first year I attended there were close to 40 people.  3 tables (one dining table that sits almost 20!!), 2 behemoth turkeys, pounds and pounds of potatoes, and enough appetizers to feed a small army.  There are now 4 generations at Thanksgiving and it's been so much fun to watch such a large family grow and change.  Despite the abundance of food last Thursday, cooking must continue.  I whipped up these delicious caramel bars.  They are so rich that 3 or 4 days later, there are still a few tightly wrapped in cling wrap to be enjoyed each evening with a cup of hot tea.  I recommend making these when there are enough people to share with!


Salted Caramel Crumb Bars
(slightly adapted from Cookies & Cups)

2 Cups room temperature salted butter
1 Cup sugar
1 1/2 Cup powdered sugar
1 Tbl vanilla
4 cups flour

Preheat oven to 325°.  Beat the butter and sugars together until creamy.  Add in the vanilla.  On low, gradually beat in the flour.  Press 1/2 of the dough into the bottom of a greased 9x13 pan (place remaining dough in the refrigerator).  Bake 15-20 minutes.  Remove and cool for 10-15 minutes.  While cooling, make the caramel.

1 bag caramel candies, unwrapped 
1/3 Cup cream
1/4 tsp vanilla
1 tsp sea salt (or kosher salt)

Combine the caramels and cream in a microwave safe bowl and microwave for 1 minute.  Stir and continue microwaving for 15 second intervals, stirring between, until completely melted.  Stir in the vanilla.  Pour over the crust and smooth.  Sprinkle with salt.  Crumble the remaining dough on top evenly.  Bake 30-35 minutes.  Let cool.  Cut into squares and serve.  


This post is linked to A Little Nosh's Tastetastic Thursday and Miz Helen's Full Plate Thursday.  Check out all of the great recipes there!

Tuesday, November 29, 2011

Better than Biscuits Bread Pudding

It comes as no surprise to people who know me well, that I'm approximately 65 at heart.  I've always acted old for my age.  In high school when I wore high heeled loafers and dress pants I was frequently mistaken for a teacher (not once, or even twice...but many, many times).  I've been to three concerts in my life, Rascal Flatts (point in my favor), Bon Jovi (point in my favor), and Gordon Lightfoot (negative 100 points).  I've never been in a dance club, ever.  I would live in cardigans.  I like to bake, crochet, and cross-stitch.  Go ahead, you can set me up to be friends with your septuagenarian acquaintances   One of the biggest clues that I'm much older than my years, is my love of bread pudding.  Seriously, I love it!  With milk chocolate, as overnight french toast, with fruit, with white chocolate sauce drizzled over the top.  This bread pudding is simple.  I used 4 leftover Grands Biscuits, but you could use any leftover bread you prefer.  P.S.  Bread pudding makes for a very unappetizing picture, but trust me it's delicious!


Biscuit Bread Pudding
4 Day Old Grands Biscuits (or equivalent)
2 eggs
1/4 Cup sugar + 2 Tbl
1/4 Cup heavy cream
1/2 Cup milk
1 1/2 tsp vanilla

Preheat oven to 350°.  In a bowl, beat eggs and 1/4 cup sugar together.  Beat in milk, cream, and vanilla.  Break biscuits in bite sized pieces and toss in the egg mixture.  Refrigerate at least 2 hours or overnight.  Pour into a lightly greased pie plate, sprinkle with 2 Tbl sugar.  Bake 25-35 minutes.  Serve warm.  

Saturday, November 19, 2011

Simply Cookie Saturday #2-Snickerdoodles!

Snickerdoodles are back!  I'm sending this super simple cookie on a a trip to Texas (rather than staying here and being devoured slowly enjoyed).  I love to whip up a batch of this yummy cookie (in bar form) or in the classic rolled variation.  This recipe is slightly different than most because I replace a bit of the white sugar with brown (making them even chewier!) and a 1/2 teaspoon of vanilla with almond extract.  Yum.  You'll love how your house smells when these are baking (unless you don't like the smell of happiness--if that's the case, you probably won't like it at all).


Snickerdoodles
(makes ~3 dozen 2 inch cookies)
1 Cup salted butter, softened
1 Cup sugar
1/2 Cup brown sugar
2 eggs
1 1/2 tsp vanilla extract
1/2 tsp almond extract
2 3/4 Cups flour
2 1/2 tsp cream of tartar
1 tsp baking soda
1/4 tsp salt

Preheat oven to 400°.  Cream butter and sugars together with an electric mixer.  Beat in the eggs and extracts until creamy.  In a separate bowl, whisk together dry ingredients.  Gradually beat the dry ingredients into the wet.  Roll the cookies into walnut size balls and then roll in cinnamon sugar mixture (recipe below).  Bake on an ungreased cookie sheet for 6-9 minutes (if putting 2 trays in, make sure to rotate top/bottom half way through).

Cinnamon sugar mix
2 Tbl white sugar
2 Tbl raw sugar (can also use 1 1/2 Tbl white sugar)
3 tsp cinnamon

Wednesday, November 16, 2011

Slow Cooker Balsamic Chicken


My little one and I are packing up for a long weekend trip to sunny Florida to see family there.  I'm so excited to see the sun again.  I love the cooler weather that fall and winter bring (yup, even the below freezing temperatures), but I really hate the gray that seems to take over the landscape as soon as the leaves drop.  I've given up trying to take food pictures in the natural light, because the most natural light we see during the day is the glow of a bright day on television.  This is the first time for baby to fly (she's a bit over one), so I'm a little nervous about how she's going to deal with 2 hours cooped up on a plane.  But, on the other hand, I've flown with my husband several times, and if I can make it through a flight with him, then I'm thinking a one-year-old in my lap is going to be no problemo.  I have a Simply Cookie Saturday scheduled to post (you're just going to have to wait!) for while I'm away, but I wanted to leave you with a great fall slow-cooker dish.  This is so simple and tasty.  Next time, I'll definitely toss some broccoli in at the end, but feel free to adjust to your tastes.  I've heard quite a few friends talking about a balsamic chicken in the slow-cooker, but I'm not a huge fan of tomatoes, so this is a tomato-free variation.  


Slow Cooker Balsamic Chicken
2 large chicken breasts, cut into large chunks (I used boneless, skinless, frozen, breasts)
2 Tbl flour
3/4 Cup brown sugar
1/4 Cup Diet Sprite (or similar white soda)
1 clove crushed garlic
1/2 tsp. grated ginger (I like fresh)
2/3 Cup balsamic vinegar
2 Tbl soy sauce
black pepper to taste

Toss chicken breasts in flour to coat and set aside.  Combine all other ingredients in a large slow cooker.  Add chicken and stir.  Cook on low for 6-8 hours, or on high for 2-3.  About 20 minutes before serving, pull chicken slightly (not to the consistency of pulled pork), you just want nice bite size chunks.  Add any vegetables you'd like (broccoli or sugar snap peas would be great).  Cook on high for 10-20 minutes more.  Serve over brown rice.  

This post is linked to A Little Nosh's Tastetastic Thursday and Miz Helen's Full Plate Thursday check out all the great recipes there!


Friday, November 11, 2011

Simply Cookies Saturday #1-Cinnamon Chocolate Tea Cakes


With the holidays fast approaching I thought it would be fun to do a weekly cookie post.  I do my holiday cookie making on December 23 and 24, I'm not a big bake and freeze kind of person. This doesn't mean that I can't start to think ahead a little and share some of my favorite cookie recipes.  I'll keep my posts on Simply Cookie Saturday short and sweet (hah! pun fully intended), so without further ado, Cinnamon Chocolate Tea Cakes.  This is adapted from an old yellowed newsprint recipe that comes from Nestle (also online Chocolate Chip Holiday Tea Cakes).  I love the mix of chopped chocolate, the faint warmth of the cinnamon, and the rich buttery shortbread.  


Cinnamon Chocolate Tea Cakes
Makes ~24 1 in balls 

1 Cup salted butter, softened
1/2 Cup powdered sugar
1 tsp vanilla
2 Cups flour
1 cup chopped dark chocolate (reserve 1/4 cup)
1 cup chopped milk chocolate (reserve 1/4 cup)
*Note:  you can also use semi-sweet chips in place of the 2 chocolates, I just like the blend)

Preheat the oven to 350°.  In a bowl, beat the butter and powdered sugar until smooth and creamy.  Beat in the vanilla.  Gradually beat in the flour.  Stir in the chocolate (make sure to reserve 1/2 cup total).  Form the dough into 1 inch size balls (dough is very crumbly).  Bake on an ungreased cookie sheet for 10-12 minutes.  

Allow to cool.  In a zip top bag (I really recommend a brand name baggie here), microwave the remaining chocolate at 50% power until completely smooth.  Cut a tiny corner off of the bag and drizzle the chocolate over the cookies.  

This post is linked to Literally Inspired's what you talkin' bout wednesday.  Check out this great blog and great party!

Wednesday, November 9, 2011

Pumpkin Crumb Bars

Just about every blog I read has had at least one (if not several) inspiring pumpkin recipes (I can't wait to try this Pumpkin Risotto from Lauren @ Hey, who cut the cheese).  I hadn't jumped on the bandwagon, because despite the fact that we carve pumpkins in October, they've always been a Thanksgiving treat for me (yes, I'm slightly mental, why do you ask).  Turkey day is the only day I'm willing to touch pumpkin pie, and I think it's just because of nostalgia.  I decided to give pumpkin it's first outing for the year and make a simple dessert.  This is a rich, easy bar dessert.  Also, it's Monday morning, so I'm just going to leave it at that.

Pumpkin Crumb Bars
Crust
1 yellow cake mix (remove 1 cup and set aside)
1 large egg
8 Tbl melted butter

Preheat your oven to 350°.  Mix all ingredients and press into the bottom of a lightly greased 9x13 pan.

Filling
2 large eggs
1/4 Cup sugar
2/3 Cup evaporated milk
1 tsp. cinnamon
15 oz. pumpkin puree (not sweetened)
1/3 cup brown sugar

Whisk all ingredients together and pour over the crust.

Topping
1 Cup reserved yellow cake mix
1/2 tsp cinnamon
1/2 Cup sugar
1/2 Cup butter

Mix all ingredients together and then drop dollops on top on the filling.  Bake for 35-40 minutes.  Allow to cool and cut into single servings.

Monday, November 7, 2011

Jäger-Schnitzel

Do schools still ask children about their ethnic heritage?  This was a huge deal when I was in elementary school, we'd have nationality day and everyone would bring in food and 'costumes' from their nationality.  I would think that this is beginning to go by the wayside as we as a country are becoming more and more a true melting pot.  I just think it's becoming harder for children to define their heritage by one nationality and I also think that is a wonderful thing.  On the other side of the coin, I do think it's important to learn about other cultures (especially their foods!).  Somehow today's post got a little serious...Let me lighten things up a bit for you.  For dinner, I made Jäger-Schnitzel.  Jäger-Schnitzel is a variation of the traditional German dish Wiener-Schnitzel (minds out of the gutter--it's pronounced with a "v" sound).  Wiener-Schnitzel is made with Veal Cutlets and is breaded, seared in a skillet, and served with lemon slices.  It's super delicious, but I have never cooked veal and the pricey-ness can make it prohibitive for a weekday dinner.  Jäger-Schnitzel on the other hand is made with pork cutlets, served with a mushroom sauces and can be prepared traditionally (with no flour, eggs, or bread crumbs) or Wiener style, which is lightly breaded.  This looks and tastes like a dinner that takes hours to prepare, but is really quick and simple.  I went with the lightly breaded style and it turned out really well.  It's especially delicious served over smashed potatoes with roasted asparagus on the side.  I hope you give this dish a try (and give the recipes of a other cultures and countries a try, too!).  P.S.  This is probably not the most authentic German dish you'll ever try-but it's a simple way to get the flavors of a delicious German dish


Jäger-Schnitzel-Weiner Style
4 boneless pork loin chops
16 oz clean, sliced mushrooms (fresh, not canned)
4 Tbl butter
4 Tbl canola oil
1/3 Cup white wine (chicken stock if you prefer not to use alcohol)
flour
salt & pepper
2 eggs

In a large heavy skillet or cast iron pan, heat 2 Tbl butter and 2 Tbl oil over medium-high heat.  Pound pork chops to 1/4 inch thick and pat dry.  Set up 2 dishes, in one place about 2 cups of flour seasoned with salt and pepper.  In the second dish, scramble the two eggs.  Dip the pork into the flour, then the egg, and then to the flour.  Shake any excess off.  Cook the pork cutlets in the skillet until brown on the outside and cooked through.  Remove the cutlets to a plate.  Add  the remaining oil and butter to the pan and saute the mushrooms.  Add the wine to the pan and add the pork back in.  Cook until the sauce begins to thicken.  Serve and enjoy.  

Linked up to A Little Nosh's Tastetastic Thursday and Miz Helen's Full Plate Thursday

Wednesday, November 2, 2011

Pepsi Braised Roast with Perfect Horseradish Sauce


Sometimes the best recipes come out of lack of proper ingredients.  I really wanted to make a nice roast beef drizzled with horseradish sauce, and I wasn't willing to wait until Christmas day when this sort of finery is commonly available.  So I went to the grocery store and picked up a nice 5lb prime rib roast.  Unfortunately, in my hurry (how many time I have mentioned my dislike for grocery shopping?!), I actually picked up a round eye roast.  Round eye is a really flavorful roast, but can be a little too tough for regular roasting.  So, I turned to braising.  I went into my pantry and pulled out the beef stock only to realize that in fact, I only had chicken stock.  Something about braising beef in chicken stock kind of grossed me out, so I had to think of something else.  Can't you see how prepared I am for cooking dinner?  I remembered something about cooking beef with cola and decided to replace the beef stock with some Pepsi I had on hand.  What resulted was a crazy tender roast that sliced nicely, but still melted in my mouth.  Leftovers went on toasted bread with provolone and horseradish sauce.  Let me tell you, that this in my new go-to roasting method.  You can always toss some veggies in the pot, but I like my vegetables a little crunchy, so I just serve them on the side.

Pepsi Braised Roast
Boneless Round Eye Beef Roast (or boneless roast of your choice)
1/2 Cup Pepsi (or Cola of your choice) per pound of beef
1/2 Cup Water per pound of beef
Salt and Pepper
1 Tbl. butter
1 Tbl. olive oil

Preheat oven to 325°.  In a large dutch oven or oven safe stock pot heat your butter and oil over medium high until sizzling.  Salt and Pepper your meat generously.  Brown all sides of the roast in the pan (don't forget the ends).  While the pan is still over the heat, pour in the cola.  Once the bubbling has subsided, pour in your water.  Cover and move to the oven.  Cook for ~30 minutes per pound.  You can use this awesome table to find cooking times for a variety of different meats:  The Healthy Butchers-Ultimate Roasting Chart.

Perfect Horseradish Sauce
1 part horseradish (fresh or jarred is fine)
2 parts sour cream

Stir and enjoy.

I'm linked up the A Little Nosh's Tastetastic Thursday and Miz Helen's Full Plate Thursday, check out all the great recipes there!

Sunday, October 30, 2011

Vanilla Bean Cupcakes With Vanilla Bean Seafoam Frosting

There is definitely something to be said for the way technology has changed our world.  Because of the internet I got back in touch with people I graduated with who actually live only a few miles away.  Without the help of Facebook, they would probably be completely off of my radar.  It's so much fun to stalk see the pictures of their beautiful children and learn what everyone else is up to.  Thanks to blogging and Facebook, I got a request to make cooked frosting from an old friend of mine from high school, who is in the same stage of life that I am (and who has two of the most adorable babies!).  I had so much fun trying something new and I loved getting to bake for someone else (my waistline is thankful that I let N and her family give my attempt a try).  The best part?  I think I'm going to be getting a guest post from her and I might even get to try some of her goodies. :)  On to dessert...

This was my first time making a cooked frosting (Martha Stewart calls it 7-minute frosting, but my family has always called it sea foam icing).  Call it what you will, it's a fluffy, ever so slighty sticky, shiny, marshmallowy frosting.  It was also my first (definitely not my last) attempt using vanilla beans.  For the cupcake part, I used the recipe (slightly adapted) from RecipeGirl.com (White Wedding Cake Cupcakes).  9 out 10 tasters think this was a pretty awesome cake, especially since it's a box to start.  As far as the icing, I stuck with the classic and used Martha's recipe (definitely we're on a first-name basis--aren't you?!).  Martha Stewart Frosting


Check out the fluffy loveliness of this frosting!  I didn't have an instant read thermometer (well, I have one, but one piece of it seems to have been eaten by my kitchen elves), so I used the timing method and watched to make sure everything was evenly mixed and thickening.  It's really not as difficult as I was expecting, if I can do it, you can too!


Vanilla Bean Cupcakes
(Makes ~ 36 cupcakes)

1 box white cake mix (I highly recommend Duncan Hines)
1 Cup flour
1 Cup sugar
1 tsp. salt
1 1/3 Cups water
2 Tbl. vegetable oil
1/2 vanilla bean guts(or 1 tsp vanilla extract)
1 Cup sour cream (I recommend using the full-fat version for this application)
4 egg whites (from large eggs)

Preheat oven to 350°.  Line cupcake pans with liners or grease and flour pans.  Combine the dry ingredients in a bowl with a whisk.  Add the remaining ingredients and beat with an electric mixer for about 2 minutes or until just combined.  Fill cupcake pans about 1/3-3/4 full and bake for 20 minutes.  Allow to cool completely before frosting.

Vanilla Bean Sea Foam Frosting
1 1/2 Cup sugar
2 Tbl light corn syrup
2 large egg whites
1/4 Cup water
1/2 vanilla bean guts

Combine all the ingredients in the top of a double boiler over simmering water.  Heat over medium, stirring often, until the mixture reaches 160° on an instant read thermometer (or about 2-3 minutes).  Remove from heat, and using an electric mixer, beat on high until glossy and fluffy.  Should take about 5 minutes.  Use a zip-top bag or an pastry bag to frost cupcakes or spread with a small offset spatula and create mini peaks.  


Friday, October 21, 2011

Chop-less Chicken Pot Pie

So, I'm not generally a casserole person.  I just don't really like all of my meal smooshed (apparently smooshed is not a word?!) up in one dish.  I like order and sanity in my meals.  Meat here.     Veggies waaay over here.   Starch, in the other corner.  Never shall they touch or mingle.  But, almost 5 years ago I got married and learned all about compromise.  My husband loves his food all together.  The more food groups in one pan, the happier the man gets.  So, I've learned to appreciate a few basic casseroles to keep him happy.  One of my favorite is a chicken pot pie.  It looks like you put hours and hours of work in to it, but in under an hour you can have two pies ready to eat or freeze.  My method skips the chopped carrots and celery in favor of frozen veggies, but you can use what you prefer.  I have bad luck with fresh veggies in my house.  I either have to buy it just for a certain recipe, or I find it weeks down the road, making friends with mold in the bottom of my fridge.  I have really good luck with frozen vegetables--I get variety, and they still have that fresh flavor.  I used the pie crust recipe from the Pioneer Woman's Cook Book (Recipes From an Accidental Country Girl) which I highly recommend for pot pies and other savory uses.  In my (very humble) opinion, it's too crumbly to work in a situation where you want to cut out the perfect slice of pie. Hope you give this a try--it's the perfect fall comfort food.
P.S.  I have no idea what I was going for with the 3 little circles on the pie crust.  Let's pretend it's super creative.  


 Chicken Pot Pie
(Makes 2 8-inch pies)
2 Pie Crusts (Perfect Pie Crust or Store bought, or Crust of Choice)
2 Standard bags of frozen mixed vegetables
4 Tbl butter
2 Cups shredded cooked chicken (3 roasted breasts or 1 whole roaster)
1/4 Cup flour
1 3/4  Cup chicken broth
1/4 Cup white wine (optional)
3/4 Cup heavy cream
1 tsp thyme
1/2 tsp crushed red pepper
Salt & Pepper to taste

Preheat the oven to 400°.  Melt the butter in a large skillet.  Add the frozen vegetables and saute until soft.  Add the chicken and stir.  Add the flour to the pan and cook for a few minutes.  Add in the chicken broth and wine while stirring.  Pour in the cream.  Stir gently to combine and then allow to cook over low heat until thick.  Season with thyme, red pepper, salt, and pepper to taste.  Pour the mixture into one 9x13 pan or 2 pie plates.  Cover with crust(s) and slit the top.  Bake for 30-40 minutes until the crust is golden brown and the filling in bubbly.

If you freeze the second pie, bake at 375 for 40-45 minutes directly from the freezer.

This post is linked to A Little Nosh's Tastetastic Thursday, check out all of the great recipes there.

Tuesday, October 18, 2011

Cinnamon Roll Coffee Cake + Social Networking Update


So, my husband and I are pretty with the times.  We've upgraded the TVs in our house with flat-screens.  We have a laptop and smart phones.   I use Facebook (I was in college when it was invented-for college students) and Pinterest and I maintain hubby's Facebook page.  We try not to whine about technology, but we had a recent realization.  Neither one of us Tweet.  Which, seems like nothing to most people.  But, we have a baby girl.  Who some day is going to grow up and know 1 million times more about the current technology than we do.  We made the decision that we have to at least learn about new tech trends (like Twitter) or the slippery slope into calling our daughter in the future and asking her program our VCR will begin.  So, Mike signed up for Twitter and follows 3 local news stations and his cousin who is a kind-of celebrity.  I signed up for Twitter and follow a few blogs I like.  Between the two of us, we have made (tweeted, twote?) 2 tweets-both of them re-tweeting an Amazon.com giveaway in order to recieve $5 in credit.  I'll give you one guess as to who did that Tweeting.  Are we experts?  Um, definitely not.  Trending still blows my silly little mind.  But, we've at least got a grip on current technology, and we're going to keep pushing ourselves to try things new so that someday, when my little girl wants to try this new "forehead implanted cell phone,"  I'll know enough to tell her "no" intelligently.  In this same vein, I created a Facebook Page for this blog.  What's Cooking With Kacey  Please follow me there to get updates (while you're at it, I'd love a Google follow too!), I'll be having my first giveaway when I reach 100 Facebook or Google followers!  On a completely unrelated note, I had a craving for something cinnamon.  This Cinnamon Roll Coffee Cake hit the spot and I was able to whip it up in under and hour.  I recommend eating it warm, and sharing the leftovers because it's dangerous.  

Cinnamon Roll Coffee Cake
(adapted very slightly from Cooking up North)
Cake
3 Cups flour
1/4 tsp.salt
1 Cup sugar
4 tsp. baking powder
1 1/2 Cups milk
2 eggs (room temperature preferred)
2 tsp. vanilla
1/2 Cup salted butter, melted and let cool slightl
y

Preheat the oven to 350°.  Mix all of the ingredients together except the butter until combined.  Slowly fold in the melted butter.  Spread into a greased 9in round or 9x9 pan.

Topping
1 c. butter, softened
1 c. brown sugar
2 Tbl. flour
1 Tbl. cinnamon

Combine all ingredients and drop by the spoonful onto the batter.  Use a butter knife to swirl through.  
Bake cake for 30-35 minutes.

Glaze
2 Cups powdered sugar (sifted or whisked)
5 Tbl. evaporated milk
1 tsp. vanilla

Mix ingredients and pour over cake while warm.  Serve and enjoy!

Saturday, October 15, 2011

Smore's Parfait


Tomorrow is my baby's first birthday party.  I know it is totally cliche, but I have no idea what happened to a year.  We still have a week to go until her actual first birthday-a week that, I'm sure will go nice and slow so that we can relish all the time we have with her.  We're having a party at our house tomorrow to celebrate this milestone, so things have been a little crazy around here.  Mike and I got it into our crazy brains that late summer was the perfect time to tear out some walls and replace flooring.  Needless to say, if you read the above statement about time, summer turned into fall and we're spent the last few weeks scrambling to finish to the point that we can have company.  Thankfully we're almost done and the dust is gone from the house (well, except for the 1/2 inch currently coating our dining room floor--no one will notice that, right?!).  Today because my life is crazy and because I'm sure yours is too, I bring you Smore's Parfaits.  I actually made these on vacation so they are simple and yummy and perfect for kids.  Just layer Crunched graham crackers (or Cars crackers that performed double duty for me), chocolate pudding (I used a box), grahams, chocolate pudding, toasted marshmallows.  To toast the marshmallows, I sprayed foil with nonstick spray, laid the 'mallows in a single layer on a toaster oven baking sheet, and broiled (WATCH carefully).  Then use a spoon to lower into the glass.  Disclaimer:  These are not a gourmet treat.  Simple, yes. Satisfying, yes.


Friday, October 14, 2011

Something A Little Serious

If you've read my blog at all over the last few months, you know that I never post anything besides silly anecdotes with a spider-web of relevancy to my recipes.  I hate conflict so I don't post political opinions and I'm certain you don't know which toilet paper I prefer (though, it's universally the best, so I'm sure you can guess).  I don't post charities to which I donate, and I don't ask you to give to any causes.  Today, I'm not going to ask you to do anything above and beyond thinking about something.  Tomorrow is Pregnancy and Infant Loss Remembrance Day and this is something very close to my heart.  Miscarriage effects twenty percent of pregnancies.  Yes, that's 1 in every 5 pregnancies.  This means that chances are good you know someone who has lost a child during pregnancy.  This is still (in 2011) a taboo topic.  Something we don't want to talk about or share.  Often women and men who have lost a child during pregnancy or shortly after birth feel very alone.  A lot of people don't know that Mike and I had two miscarriages before having our little one.  It's something we don't talk about often.  The moral of the story is that if you've lost a child, or know someone who has, you are not alone.


The International Wave of Light invites participants from around the world to light a candle in honor of PAILRD, starting at 1900 hours on October 15 in their respective time zones, and to leave the candle burning for at least an hour. The result is a continuous chain of light spanning the globe for a 24 hour period in honor and remembrance of the children who die during pregnancy or shortly after birth.  


"Women & Elephants Never Forget."

*Sugar Cookies made from Bake @ 350's wonderful recipe.  Check it out here:  Cut Out Sugar Cookies

Wednesday, October 12, 2011

Hermes (aka Chicken Caesar Wraps)

For my second half of college my (now) husband and I lived in the same town while attending two different colleges.  I had a tiny efficiency apartment that had roaches crickets for one year, and a teeny-tiny bedroom in a house with two girls the other year.  He, however, lived in a large house with 4 other people for the last two years of school.  I loved being close to him (the first two years of college are a long, depressing, and boring story), but we had really different schedules.  He was an engineering student who spent about 30 hours a day studying, and worked at the library here and there between classes.  My classes had a lot of homework and not a ton of studying, but I did work at a hospital from 5:30am until I went to class at 9:00am.  Then I'd go back to work for an hour or so after class.  It worked out really well for me, but I was always surprised by how much I didn't see my boyfriend who only lived two blocks away.  Even when he and his roommates took a break from studying and threw a party, I generally was asleep before the guests even showed up!  One of my favorite things his house-mates all did together was to cook dinner before a party (yup, they were even nice enough to include me).  This gave me an excuse to eat, enjoy other people, and socialize before my normal bedtime of 10:00 (yes, this is the start time of most college parties.  Yes, I'm lame.  Yes, I'm even lamer now).  Anyway, the usual dinner of choice was either tacos or Hermes.  (pronounced Her-me's--not all fancy-like).  Apparently Mike's friend W spent his childhood between several countries as a military child and this is a lunch he got in Italy very often.  I can't vouch for the story, and I definitely can't make them as well as his Mom!  I'm not going to give definitive measurements in the recipe because it's a taste as you go kind of meal.  I'm not a huge Mayo fan, so I use a little less of that than the Caesar dressing, but you can switch things up however you like.  Also, feel free to mix things up--avocado, roasted tomatoes, toasted pecans are all great in the mix.  Serve it in warm pitas, flour tortillas, or just scoop it into a bowl.


It can't get any simpler.  Toss the ingredients in a bowl and then serve!  


Hermes (aka Chicken Caesar Wraps)
2 hearts of romaine (or 1 iceberg head), chopped into bite-sized pieces
1/2# bacon, cooked until crispy and then crumbled (use more/less if desired)
2 small chicken breasts, cut into bite-sized pieces, then cook in 1 Tbl bacon fat 
shredded cheddar cheese (~1 Cup)
mayo (~1/4 Cup)
Caesar Dressing (~1/4 Cup)
Pepper (~2 tsp)

Mix all ingredients together in a large bowl and make sure to taste as you go-adjust measurements as needed for your taste.  Serve on tortillas, pitas, or as a salad.  

I'm linking up to A Little Nosh's Tastetastic Thursday.

Friday, October 7, 2011

Easiest Ever Seafood Dip

Growing up, we spent our Thanksgiving, Christmas, and Easter running between different grandparents' houses.  We had wonderful, albeit crazy days.  Christmas eve, though, we spent at home.  We'd go to church and then my mom would make snacks and we'd relax.  Sometimes we'd have company, sometimes it would be just our little family.  Inevitably, there would be seafood dip.  I'm not sure why I've been thinking about this dip so much, maybe it's the Christmas decorations that are popping up in stores next to Halloween and Turkey Day displays, or maybe it's just the cooler weather that is starting to creep in.  For some reason, this easy, delicious spread only made an appearance on Christmas Eve (and then on New Years Eve).  My mom was way smarter than me and split the dip onto two small plates, I make the entire serving in a pie plate and have to exert inhuman self-control to stop my self from grabbing a cracker-ful every time I walk past the refrigerator!  Give this dip a try for football games, or the holidays, or an afternoon by yourself.  *Note that I use a small can of crab meat, my mom always used a small can of clams, and I have an aunt who always used these minuscule shrimp.  What I'm saying is use what ever you like--but make sure it's cooked and ready to eat (not raw).


Seafood Cream Cheese Dip
1 8oz package cream cheese, softened
1 6oz can cooked crab meat (or shell-fish of choice)
1 12oz bottle cocktail sauce
1 Tbl horseradish (optional, to taste)
1 dash hot sauce

Spread the cream cheese on the bottom of a pie plate (or 9x9 dish).  In a bowl, mix all of the other ingredients.  Spread mixture on top of the cream cheese.  Serve with crackers or toasted bread rounds.

This post is linked to A Little Nosh's Tastetastic Thursday.  Check out all the great recipes there:  Tastetastic Thursday