Friday, September 30, 2011

Weekend Waffles


There's a weird thing that happened when I started blogging about food.  I want to spend all my time making sweet treats and left-field dishes that are blog worthy.  My desire to cook a square meal for my family becomes  less and less.  I've always preferred baking to cooking, but now whipping up a main dish and sides that aren't pretty for the blog just isn't as much fun.  One of my favorite dinners is actually breakfast.  We all love sitting down to omelets or waffles after a long day.  The thing about waffles is that are lots of 'levels' of difficulty.  On one end pop an Eggo in the toaster.  The other side of the spectrum are yeasty Belgian waffles.  I actually love all waffles, but I have 3 go-to recipes depending on the occasion.  The quickest and easiest is a mix.  Yes, I use a box occasionally.  But, I only use Krusteaz Belgian waffle mix (Nope, Krusteaz isn't paying me to say that--I just like them).  It creates a fluffy on the inside, crunchy on the outside waffle.  The third and most complicated is an amazing overnight rising yeast waffle.  I hate to tease you, but I'll have to save this recipe for another day.  My every day waffle is pretty simple, but dirties waayy too many bowls for my general enjoyment.  So, if you're looking to make friends this weekend, or if you're too lazy to make a 'real' dinner, give this a try this weekend.  Note, this recipe only works (as far as I know) in a Belgian waffle maker.  


Belgian Waffles
(Make 4-5 Round Waffles)

  • 4 eggs (divided)
  • 2 teaspoons vanilla extract
  • 2 cups buttermilk (or 2 cups milk and 2 Tbl lemon juice-combine and let sit for 10 minutes)
  • 1/2 cup melted salted butter
  • 2 cups flour
  • 1 Tbl baking powder
  • 1 Tsp baking soda
  • 1 Tbl white sugar
  • 1/2 tsp salt

  • Combine the egg yolks, vanilla, buttermilk and melted butter in a bowl.  In a separate bowl whisk (or sift) together the dry ingredients.  Stir the dry ingredients into the milk mixture until just combined.  In a 3rd bowl, beat the egg whites with an electric mixer until stiff peaks form.  Gently fold the egg whites into the batter (it's okay to see white spots here and there-don't over mix).  Cook in your waffle maker according to directions.  My machine takes 2-3 minutes per waffle.  

Thursday, September 29, 2011

Buffalo Chicken Egg Rolls

We've already discussed my love for all things buffalo, but I haven't mentioned my love for Pinterest.  I have tons and tons of recipes pinned to try, some simple, some super complex, but all delicious.  The highly addicting  Pinterest is what first turned me on to these buffalo egg rolls (Can You Stay For Dinner's Buffalo Chicken Rolls) which are pretty dag-gone good.   According to the recipe these should be baked (not fried).  Because I have only deep fried anything once (and it was a complete disaster) and because I really try not eat fried things excessively, I also baked them.  Here's the caveat, they were good baked, but they'd be phenomenal fried.  So, if you have the time, skill, and inclination, give them a try that way too.  By the way, when you're looking for egg roll wrappers, they are generally in the produce section near the refrigerated salad dressings.  

Start by  mixing the cooked and shredded chicken together with buffalo sauce (you can make your own by combining 1/2 Cup Red Hot Sauce with 2 Tbl melted butter and a dash of Worcestershire sauce).


Next, top the egg roll wrappers with a bit of dry coleslaw mix, 2 tablespoons of the chicken mixtures, and 1 tablespoon of crumbled blue cheese.  Then fold the egg roll wrapper like an envelope.  Moisten the top corner edges and fold over.  


Place the completed rolls onto a greased rack on top of a baking sheet.  

Bake them at 400 for 15-20 minutes.  

Buffalo Chicken Egg Rolls

12 egg roll wrappers
2 cooked and shredded chicken breasts
1/2 Cup buffalo sauce
1 Cup crumbled blue cheese
1 Cup dry cole slaw (cabbage mix)

Preheat the oven to 400°.  Layer the egg roll wrappers with dry cole slaw, 2 Tbl chicken mixture, and 1 Tbl blue cheese.  Wrap the egg rolls and place onto a rack over a baking sheet.  Spray the rolls with cooking spray (or brush with canola oil) and bake for 15-20 minutes.  Serve with blue cheese or ranch dressing.  

This recipe is linked to A Little Nosh's Tastetastic Thursday.  Check out all of the great recipes there!


Wednesday, September 21, 2011

Works For Me Wednesday-Potato Gloves

Parissa Exfoliating Gloves
A friend of my possesses the coolest kitchen gadget ever!  One day I was lamenting the fact that I haven't (in the nearly 10 years I've been on my own) been able to find a potato/veggie brush that worked for me.  She mentioned that she had a pair of potato scrubbing gloves from Williams-Sonoma.  In my head I was picturing those goofy as-seen-on-tv gloves, but NO, these are awesome.  I tried them on a dirty potato in her pantry and I almost cried with joy (yes, this is my life).  You can get them here from Williams-Sonoma (Potato Scrubbing Gloves) OR you can do what I did.  You see, when I tried those gloves, they reminded me of a certain pair of cheapie exfoliating gloves I had years and years ago.  So, I headed to my local Dollar Tree and purchased 2 single gloves at $1.00 a piece.  I now have my very own set of potato gloves.  They are gentle enough to use on veggies and gold/red potatos with thinner skin, but aggressive enough to use on regular Idaho potatoes.  

I highly recommending either investing in the WS pair ($11.95) or picking up some exfloiating gloves from your local dollar store or Walmart.  Skip the junky brushes!  Plus, just toss them in the laundry or dishwasher to get them nice and clean.  

This is my first time linking up to Works for Me Wednesday at http://wearethatfamily.com/.  Check it out!  

Disclaimer:  Williams Sonoma and Dollar Tree did not compensate me in anyway for this post--they don't know I exsist.  I just think they are awesome.  

Tuesday, September 20, 2011

Puffy Pancakes


When I was growing up we ate breakfast at a fancy* pancake place occasionally.  *Fancy here just implies that it wasn't within 5 minutes and it wasn't the local Eat 'N Park.  They have (or had, I'm honestly not sure if they are still in business) on their menu an item called Dutch Babies.  The description was right out of a thesaurus.  "Fluffy, light, airy pancakes baked and topped with cinnamon apples--takes 40 minutes to prepare."  Now, I have pretty awesome parents, but I think the idea of waiting an extra 40 minutes for breakfast in a crowded restaurant didn't really appeal, so while I was never told not to order these delectable pillows of goodness, I was definitely dissuaded.  I honestly kind of forgot about this breakfast treat until last winter when I saw a picture of the infamous dutch baby in a magazine.  I searched and found about a bazillion recipes.  Apparently they are not all that elusive.  AND, the best part?!  They certainly don't take 40 minutes to prepare.  The worst part is having the patience for your oven to preheat to a scorching 475°.  Simply combine all the ingredients in a mixing bowl while the oven is preheating with your baking dish in it.  When preheated, put a few tablespoons of butter in to the pan to melt and the pour your batter in to bake. You want the pan to be very hot.  The butter will end up on top of the batter a little.  


Place bake in the oven and bake for 12 minutes until golden brown and delightfully puffy.  


It will flatten out a little when you cut into it.  There are a zillion ways to serve it.  My personal preference is lemon and powdered sugar.  Also warm maple syrup, cinnamon apples, nutella, the sky's the limit!


This recipe makes a 8-10in round (yup, any size works, all equally delicious!) and is two good size servings.  

Dutch Babies-aka Puffy Pancakes
2 eggs
1/2 Cup Milk
1/2 Cup All-purpose flour
1/2 tsp salt
small pinch cinnamon (optional)
1 tsp vanilla
2 Tbs butter

Place an 8 or 10 in casserole or cast iron pan in the oven and preheat to 475°.  Combine the beaten eggs and the milk in a bowl.  Stir in the dry ingredients until smooth and add in the vanilla.  When the oven is preheated, remove the pan, and quickly melt the butter in the hot pan and pour the batter into it.  Return to the oven, lower the temperature to 425° and bake for 12 minutes.  Enjoy!


Monday, September 19, 2011

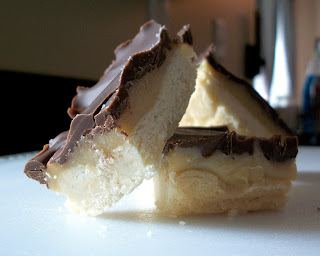
Billionaire Bars

What's your favorite dessert?  Definitely a loaded question.  If I'm asked the magic question,  I mentally scramble between New York Cheesecake, dark fudgey brownies, tart key lime pie, Krispy Kreme donuts, caramel anything...should I continue?  However, asking my husband yields a much simpler response.  Apple Crisp, Key Lime Pie, or Twix Bars.  Yup, that's it.  Sometime I think I need a surrogate husband to enjoy my baking.  Luckily, Mike will try anything (once) and almost always appreciates one serving of dessert.  Sometimes I like to really spice things up in our marriage and ask him to pick something new for me to make off of Pinterest (find me-Kacey Shoupe) or my growing recipe file.  Imagine my surprise when he picked the very trendy Millionaire Shortbread (aka home-made Twix bars)-he's nothing if not consistent.  I followed a few different recipes, and planned on cutting them long and thin and then dipping them in chocolate.  Unfortunately I'm a messy chocolate dipper and I was too lazy for the extra work, so a simple layer bar is whatcha get.  Now, you may be asking what makes my bars billionaire bars?  In this economy, isn't a million enough?  To that I say, when it comes to money and chocolate, there is no such thing as too much.  I call my bars billionaire bars because I dipped them in melted Dove milk chocolate.  
I encourage you to use what ever chocolate makes you swoon.  These are a pretty simple dessert, the hardest part is making the caramel out of the sweetened condensed milk and there are a few ways to go about it.  One is to put the unopened can sumberged in water in a slow cooker for 8 hours.  You can also cook on the stove top on low until it turns a nice dark caramel.  I used the microwave method (which I'll detail in the recipe).  Enjoy!

 Billionaire Shortbread

Crust:
1/4 Cup sugar
1-1/4 sticks salted butter, at room temperature1-1/4 Cups all-purpose flour1 large egg yolk, lightly beaten

Caramel Layer:
1 can sweetened condensed (14oz)
1/4 tsp kosher salt

Chocolate Layer:
8oz milk chocolate (I recommend Dove)
1/2 tsp canola oil

Preheat the oven to 350°.  Line a 8x8 pan with parchment paper (make sure all four sides are covered to save you a lot of scrubbing).  Grease or spray the paper.  With an electric mixer, blend the butter and sugar until smooth.  On low, add in the egg yolk.  Coat your hands in flour and gentle knead dough until it comes together (I don't use the counter to knead to save mess).  Press into the bottom of the pan and dock generously.  Bake for 20-25 until lightly browned.  Cool to room temperature.  

For the caramel, empty the can into a medium or large microwave safe bowl.  Cook on medium power in microwave for 4 minutes.  Stir.  Cook another 15-25 minutes at 20%, stirring every 2 minutes until it turns a nice rich caramel color (you won't notice a change until the end).  Spread over the cooled crust.  

Refrigerate until the the caramel sets.  Melt the chocolate and the oil in the microwave or over a double boiler.  Spread over the caramel layer.  Refrigerate until set.  Cut and serve.  Store in the refrigerator covered.  

Barbecue Sloppy Joes

Do you want some fun piled on a bun?  Do you want a mamwich please?  Sorry to get that jingle stuck in your head, but I couldn't resist.  Here's the truth though, I'm not a huge mamwich fan.  I'm not even a huge traditional tomato-ey sloppy joe fan.  But these BBQ sandwiches--definitely a fan.  We just came back from a wonderful beach vacation where we did absolutely nothing besides play with the little one, read, and chase baby girl around and schlepp beach gear back and forth relax.  
Unfortunately, it took us a few days to get back into the groove of real life.  Enter the easiest homemade Mamwich ever!  First brown some ground beef.
Then, drain your beef and put into a slow cooker with some ketchup, brown sugar, and garlic powder.  Cook on low for 5-6 hours or on high for 2-3.  Diet Dr. Pepper makes good hydration for this strenuous cooking.  
 Serve on a nice toasty bun (with some pepper jack cheese if you're me).

Barbecue Sloppy Joes
2 lbs ground beef, browned and seasoned with salt and pepper
1 Cup brown sugar (loose, not packed)
1 Cup ketchup
1-2 tsp garlic powder

Combine all ingredients in a slow cooker for 5-6 hours on low, or for 2-3 hours on high.

This post is linked to the fabulous Amy @ A Little Nosh's linky party!  Check it out:  Inaugural Linky Party

Saturday, September 3, 2011

Cheesy Taco Bake


I'm so ready for this summer to be over.  I'm definitely not a fan of heat in any form, so basically my oven hasn't been on more than a handful of times since April.  Oh, and by the by, I'm allowed to whine about summer because I don't complain in the winter.  I love winter foods and winter clothes and cold weather.  I like wearing scarves and knee high boots, and baking.  (We can still be friends, right??)  By the end of August, I'm usually in withdrawal from the oven and sick of grilled boneless skinless chicken breasts (we have these in some form at least twice a week).  So, I took it upon my self during a rainy day last week to put together one of our favorite quick and easy casseroles.  As a little side note, I'm generally not a casserole person-I like my foods distinguishable and separate.  Hubby, on the other hand would be happy with dinner smoothies.  Give this a shot for a cool fall evening.  It serves 4-6 people.  We generally both get dinner and make 3 small lunches out of it.

P.S.  I'm hitting up the beach with my family, so posting will be a little less...but I'll be back soon. :)


Cheesy Taco Bake
1 package macaroni and cheese (I use the 'blue box', but it's also good with Velveeta or Kraft deluxe)
1 lb ground beef (or turkey)
1/3 Cup taco seasoning (or 1 package)
3/4 Cup sour cream
1 1/2 Cup shredded cheese (divided)
1 Cup Salsa
Crushed Fritos or Tortilla Chips

1.)  Preheat oven to 400°
2.)  Brown your ground meat, and then drain.  Add the meat back into the pan and stir in the taco seasoning.
3.)  Prepare macaroni and cheese according to package directions, and then stir in 3/4 C of shredded cheddar and the sour cream.\
4.)  Spray a 8x8 square lightly with cooking spray.  Spread half of the macaroni and cheese in the bottom.  Top with ground meat.  Layer on the remaing macaroni.  Top with Salsa (use less or more according to your tastes) and then remaining cheese.  Finally sprinkle with the chips.  
5.)  Bake 15 minutes.

Alternative:  If you like your mac and cheese to have crunch to it, bake for 15 minutes without topping the casserole with salsa and cheese.  Then top and bake 5 more minutes until cheese melts.